*** François likes menthol cigarettes, sandwiches with mozarella and um... oh yeah, the ladies.
Hello there! :)
I know i haven't been around much lately but I swear those German language exams are endless... I haven't had the time to draw or walk around town and take pictures but hey! It's summer already and it's all going to change. Well, after Monday, I mean. That's when my last exam is.
Ugh, what a couple of months it has been! I've started with simple german expressions like "Hi, how are you" and "Oh, I understand." and now I am talking freely (and not so freely) about Freizeitbeschäftigungmöglichkeiten. (okay it's not that big of a deal, i know... It only means opportunities for free time activities. But it sounds somehow impressive, doesn't it?).
As much as I like the rainy summer days here in Vienna, i just can't wait to go back to Bulgaria. Until then I will draw funny men like Monsieur François here at 6.30 in the morning and I will drink watermelon bubble tea. And I will try to show up here more often, too!
~
Sunday, June 24, 2012
Sunday, May 06, 2012
A Man Lost in a Place
Hello there! Wow, I can't believe my favourite month of the year is already here! Life seems to go so much faster when you speak German. Seriously.
I've planned lots of fun things for May, a couple of new projects, a trip (my camera is so bored! I need to take her somewhere!), and a cute surprise for you, too! Can't wait!
In the meantime, I've been working on some new prints. Here's a preview!
Thursday, April 26, 2012
Pencil Picture Frame DIY
Here's a quick and simple way to pretty up an ordinary picture frame and add a little pop of colour to your place! Grab your old colouring pencils and join the fun!
1. You will need: a plain picture frame (the wider - the better!), all-purpose glue, a set of colouring pencils, a sharpener and a knife or a small hand-saw to cut all the pencils with. 2. First off, we need to cut the pencils to smaller ones and sharpen every single piece. I used a kitchen knife for the job and it took me about an hour to cut the whole set of pencils and another half an hour to sharpen every piece. 3. Start arranging the little pencils on the frame without using any glue. That way you can always rearrange something you don't like, swap colours and check if you will need to cut a pencil with an exact length. 4. When you've arranged all the little pieces, make sure that the pencil-frame fit perfectly within your plain frame and there aren't any pencils slipping out. 5. Time for sticking! I don't recommend instant glue in this case, because it doesn't give you the freedom to move around the particles after sticking them. I chose a slowly drying glue, so I was able to play with the little pencils even after applying the glue and arrange them in a way that best covers the frame. (Note: round pencils would be harder to attach because of their shape! It is not impossible, of course, but it would take a lot more time.) Leave the frame aside for an hour or two for the glue to completely dry. 6. Put a favourite picture in the frame and we're done!
Have fun with this little project and be extremely careful when cutting the pencils! :)
Monday, April 23, 2012
Three to nine.
Wonderful things happen at three to nine in the evening.
Raspberry ice cream tastes better (yes, it is possible!). Singing under the shower sounds like a favourite song. The rain is warmer. The city smiles. Only at three to nine - at two to nine everything gets back to normal.
Sunday, April 15, 2012
Friday, April 13, 2012
Mother Nature
I am home and Dexter sleeps by my side. I listen to Moloko, I draw. It smells of lilies. I feel peaceful and ready for everything that is going to happen. Welcome, Spring.
Sunday, April 08, 2012
Taste of Happiness.
I am not a good cook. I mean, I try, I really try... but it's just not something that comes naturally. I always mess up recipes, experiment way too much, make huge messes and after all the trouble I end up with something that doesn't even count for a proper meal. Oh well... It's the effort that counts.
However, baking is something else. Me and my granny used to have this special tradition that made me fond of baking. Every Saturday I used to help her in the kitchen and we used to make the most delicious homemade cakes, cookies, pies and whatever you can think of.
This weekend is very special for me and Lazar. We both have namedays, we are home, we are happy and I wanted to celebrate it with something I don't usually do. There's nothing better than the smell of cinnamon and freshly baked cookies to make a holiday even more special. My granny's recipe for honey cookies mixed with my own experiments for colour icing is the perfect weekend treat. This is, undoubtedly, the taste of happiness. You should try it yourselves! Here's the *super secret* recipe (I am giving it with the permission of my granny, I promise.)
For the cookies you will need:
2 eggs, 1 cup oil, 1 cup extra fine sugar, 1 cup honey, 3/4 teaspoon baking soda, 1 teaspoon cinnamon, about 1/2 kg flour, a pinch of love.
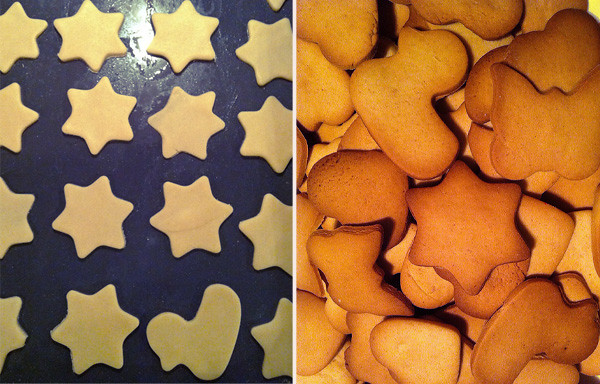
Mix the eggs, oil, sugar and honey with a mixer. Then add the baking soda and the cinnamon and 3-4 tablespoons flour. Beat until dough forms, adding 1-2 tablespoon flour now and then. Use a wooden spoon (or your hands) to mix everything better. The dough should be soft and easy to work with - perfect for cut-out forms (stars are my favourite!).
I didn't use a baking sheet and I didn't have problems with sticky cookies. But if you feel unsure, you can arrange the cut-out figures on a baking sheet and bake at 180 for about 10 minutes. Piece of cake. And then it's time for the icing - which is the most exciting part!
For the icing you will need:
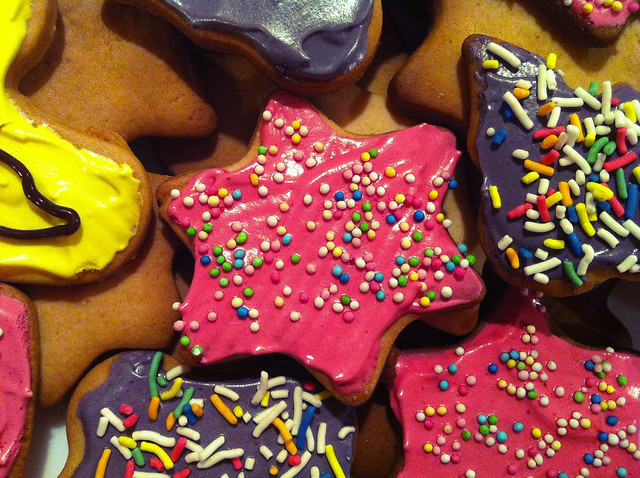
2 egg whites, 2 cups extra fine sugar and 3-4 drops of lemon juice, cooking dye, sugar sprinkles.
Beat the egg whites in a bowl until soft peaks form. Keep the mixer going and add the sugar and lemon juice. Beat on high for about 6-7 minutes until the mixture turns thick and cool. I used powder dye and put just a pinch of the three colours in three different cups and then added some of the white icing. I mixed blue and red dye for the purple butterflies and added just a little bit of orange in the yellow dye for a deeper colour. The little ducks I decorated with sugar markers in red and brown. These honey cookies are deeeelicous and are perfect for a big party or for a little home celebration. Give them a try! :)
Monday, March 26, 2012
Things that make me happy

● I finally installed a chalkboard at home and it is so much fun! I bought some colourful chalk and we're taking turns to write down our favourite quotes or quick love notes or sketch small drawings. This particular quote has been my favourite for a long time (it's too bad I don't know the source) and whenever I feel confused, or stuck, I remind myself of it.
● Snacking on gummy bears while working on something (like painting hearts on a boring set of sheets) is always a good idea. I am pretty much addicted to Haribo and always keep a spare pack around!
● It melts my heart to receive mail, every single time when I find something in my mailbox, my hearts skips a beat. This is probably because my pen-pals always know how to make me extremely happy!
● Oh, I've found the perfect place for bubble tea around! It has become a regular drink in my menu and it's the perfect refreshment. A great start of the day, too!
●What I've become literally obsessed with right now is... scarves. I can't get enough of them, really!I always fall for beautiful patterns and I am starting to pile up quite a collection here!
● Pancakes with strawberries and cream make me the happiest person on earth. Especially on a lazy Sunday afternoon.
● Finding beauty in negative spaces. Yes! You would never guess what's on that last photo. Or probably you will... I spilled some oil and luckily I was quick enough to snap a photo of these beautiful bubbles. It didn't look that good in reality, but it made a great photo, didn't it?
And lastly, what makes me reeeally happy at the moment is that in 5 days I am flying to Bulgaria. I'll get to see my mom and dad, spend some time with Dexter and rid myself of German prepositions for a while. I can't wait!
Saturday, March 24, 2012
Read of the Month: March

can hold at most two monkeys at a time. But half the monkeys always lie and the other half always tell the truth. Given that the N-th prisoner knows that one of the monkeys doesn't know that a pirate doesn't know the product of two numbers between 1 and 100 without knowing that the N+1th prisoner has flipped the switch in his room or not after having determined which bottle of wine was poisoned and what color his hat is, what is the solution to this puzzle?"
There are many famous companies that are known for their tough interview questions. Apple, Microsoft, Google and many many more seek not only high IQ or excellent school grades. They need people, who are ready to change the world and know exactly how to do it. People, who are able to think creatively and find solutions to all given situations.
The riddle above is not an actual interview question. It is an internet parody of the seemingly impossible to answer questions, given at job interviews for world's top companies. However, the real puzzles sound pretty much the same.
"Are You Smart Enough to Work at Google?" by William Poundstone is a wonderful collection of trick questions, riddles and puzzles. It doesn't teach correct answers. There aren't any. But it gives an idea of how to improve your creative thinking, how to step out of the box and look at things differently.
Here are a couple of questions you can think about, too:
- You've got an analog watch with a second hand. How many times a day do all three of the watch's hands overlap?
- On a deserted highway, the probability of observing a car during a thirty-minute period is 95%. What is the chance of observing a car in a ten-minute period?
- In a dark room, you're handed a deck of cards with N of the cards faceup and the rest facedown. You can't see the cards. How would you split the cards into two piles, with the same number of faceup cards in each pile?
A little bit confusing, aren't they? However, the book is a light read and is perfect to kill some time while riding the bus or underground. It is witty, funny, and most importantly - it makes you think.
Saturday, March 17, 2012
Hundertwasserhaus
Hundertwasserhaus is the most popular residential building in Vienna. It was built after the unusual concept of Austrian artist Friedensreich Hundertwasser and has become one of the expressionist landmarks of Vienna.
Hundertwasser's views about art and architecture have sometimes been dismissed as "unserious kitsch". He acted against the conventional boring architecture of his time. For him, the reason of human misery was the sterile, grey, monotonous architecture. Hundertwasser believed that straight lines and right angles were "godless" and propagated a type of architecture in harmony with nature, with bright colours and whimsical shapes.


The Hundertwasserhaus is designed with undulating lines and lots of colours. The original plan was the building to have uneven floors, but for practical reasons this was never implemented. The roof is covered with earth and grass and large trees grow from inside the rooms, their limbs extending from some of the windows. Colourful solid pillars support the building and numerous stucco figures and ceramic mosaics decorate it. Hundertwasser did the design of the residential building free of charge, declaring that the investment was worth it to "prevent something ugly from going up in its place".

"A person in a rented apartment must be able to lean out of his window and scrape off the masonry within arm's reach. And he must be allowed to take a long brush and paint everything outside within arm's reach. So that it will be visible from afar to everyone in the street that someone lives there who is different from the imprisoned, enslaved, standardized man who lives next door."
Saturday, March 10, 2012
Happy Weekend!

I've had a busy week and I am super excited that the weekend is finally here. Now I can finally snuggle with a cup of chocolate tea and all the fancy books I've bought during the week. ("The girl with the Dragon Tattoo", anyone? I decided to finally give it a try, I've heard too much about it to ignore it any longer.) I plan to finish some sketches, reply to all my mail, cook something special (I am getting better and better! I could even share a recipe or two!) and study some German grammar. What do you plan to do in the weekend? Whatever that is, enjoy yourselves! ~
Friday, March 02, 2012
Paper Rose Bouquet DIY
Sometimes you need the simplest and most ordinary materials to create something special. I am still in the process of decorating our (not-so-new-anymore) place and I am having so much fun! I am excited to share with you this super easy and cute paper rose bouquet diy!

1. You will need: Paper/cardboard in your favourite colour (mine isn't red, but it goes well with the interior here so I had to compromise). I preferred cardboard, because the roses come out better defined, but ordinary paper would also do the trick; a twig or two; a pencil, liner, scissors, some soft poster stickers and a small vase.
2. Cut out squares, depending on the size you want your roses to be. I didn't want mine to have the exact same shape - for the biggest one I used a 13x13 cm cardboard and for the smallest - 3x3 cm.
3. Draw a spiral on the cardboard square. It doesn't have to be perfect - just to give you an idea of where to cut. Make sure you have a little circle in the middle, this is where the stickers will hold the whole thing. Let's call this circle Mr. C, he's quite important!
4 and 5. Following the line you've drawn, cut the cardboard into a spiral. If you have zigzag shape scissors, don't hesitate to use them here! It would look even cuter! When you're finished with the cutting, take the end of the spiral and start rolling in towards the center. Roll until you hit the little circle we've left in the middle (Mr.C!) and then let loose. There you have it!
6 and 7. If you cannot find soft poster stickers, you could use two-sided duct tape as well. I prefer stickers, because they are like paste and hold the cardboard well. Put one sticker on the inner side of Mr.C and one on the back side. (He likes to stay warm.) Then adjust any imperfections while the stickers are still soft.
8. Plan how many roses you wish to have (mine are nine) and make consistent spacing. Then attach the roses to the twig and ta-da! You're done! Now all you have to do is put the bouquet in a cute vase and find a place for it :)

Thursday, March 01, 2012
Chestita Baba Martha!

Grandma Martha is one of the most revered Bulgarian rites. It is a centuries-long Bulgarian tradition symbolizing the end of winter and the coming spring. On the first of March people exchange martenitsi - twisted red and white threads - and make wishes for health and happiness. The white woolen thread signifies long life and well-being and the red one - health and strength.
People never buy a martenitsa for themselves - they are always given as gifts. Martenitsi are worn on clothing, around the wrist or neck. Sometimes people adorn their home with martenitsa tassels as a token of abundance and prosperity. All martenitsi are worn until the wearer sees a stork or a swallow returning from migration. Then the martenitsa is removed and put on a blossoming tree.
There are numerous legends about the origin of this tradition. The oldest one dates back to 681. Khan Asparukh, who established the first Bulgarian Empire, won an important battle over the Byzantine and wrote a letter to inform his people. He attached it to a pigeon's leg with a white thread. While flying, the pigeon was hurt by an enemy arrow, but nonetheless succeeded in delivering the message. The white thread, with which the letter was attached, had been half soaked in blood and became the symbol of life and prosperity.
In any case Granny Martha symbolizes the new beginning. The nature wakes up from long winter sleep and the people welcome the upcoming spring. Thanks to my boyfriend's sweet mom and a cute friend of mine, we too have martenitsi here in Austria and we follow this beautiful bulgarian custom. Chestita Baba Martha to you all, I wish you health and happiness! Spring is almost here! :)
Честита Баба Марта! :)
Subscribe to:
Posts (Atom)